For standard installation procedure use hot glue instead of Shellac, read instructions below and see standard installation video at: (see Gold pad install video).
DIAMOND TONEHOLE FILES

These pads are very flat and it is very important that toneholes be flat as well. JS diamond tonehole files are your best bet for achieving perfectly level toneholes (not recommended for rolled toneholes). JS diamond files cut faster and smoother than other files and the diamonds do not seem to wear out. You can also check the flatness of tonehole rims with the bare metal side of JS tonehole files. Beware of toneholes that are already too short from damage or sloppy manufacture. 2-1/2″ diameter files are available for baritones. 1-3/4″ files are available for low C# toneholes. A ball end driver is available for use with a low speed power drill Inbetween size pilots are also available (see tonehole file video).
ROTARY CHAMFER FILES

After the toneholes are flat you will need to smooth off the rough edges on the corners so the pad skin doesn’t get cut. The easiest way to do this is with an abrasive rubber bit as shown above (available from jewelry supplies). A protective template can be used prevent damage to a polished body. You can use a Dremel or similar hand tool.
DO NOT USE SHELLAC FOR THESE PADS
Standard shellac is very brittle and will not form a lasting bond to the plastic. Heat and clean out any old shellac and use hot glue. Apply 4 bits of glue around the maximum diameter of the cup (in the corner), add heat and drop in the pad. JS pads have a stiff backing and so it is not necessary to fill the cup with glue as you do with leather pads. It is better to leave some air space in the center of the pad so the glue has a place to go when you are leveling, otherwise some glue will squish out and make a mess. Float the pad as level as possible on the tonehole. Warm the cup while you are viewing the pad so you can see it move. Don’t overheat – Gold pads can take just as much heat as leather pads but no more. Beware that pads will compress slightly, so close them firmly to make an impression and re-check them. Make sure that they are not to light on the side nearest the axle. Expect to spend a little more time perfecting tonehole flatness and pad fitting than you would with leather pads. Also expect better tone and fewer adjustments later on.
OCTAVE PADS
Check the body octave pad with a leak light. A leak light won’t fit into the neck but you can check for a perfect seal by closing the big end off with your hand while placing the small end in your mouth. Apply vacuum (close the end with your tongue) to check for a leak.
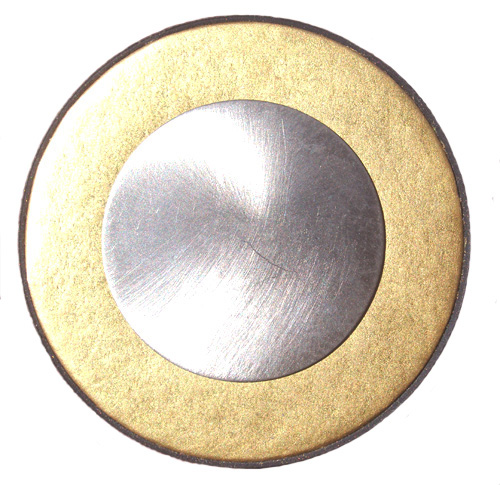
SELF LEVELING SAX PADS
Backside of self leveling pad shown above.
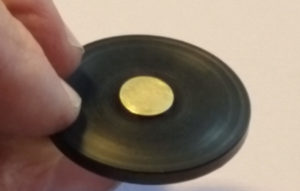
See installation video for the self leveling sax pad with center ball joint pivot here: SELF LEVELING SAX PAD INSTALLATION VIDEO.
SELF LEVELING JS SAX PADS WITH COIL SPRINGS
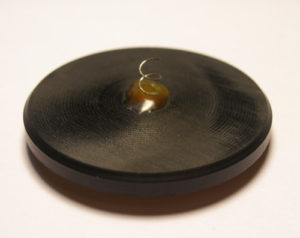
JS pad springs make installation of JS pads a snap. You must request coil springs if you want them with your pad set. The pad must be free to fall in and out of the cup without friction. Place a small dab of hot glue on the back of the pad in the very center. Quickly stick the coil spring into the glue before it cools so that it is perpendicular to the pad and let the glue harden (do not heat the spring). If it doesn’t come out right the first time then remove the spring/glue and start over. Cut the spring to approx 1/8″ length after it is glued into place. Now place 4 small bits of glue in the empty cup at the maximum diameter. Warm the glue in the cup and drop in the pad. Press the pad into the cup just a little and hold it in place while the glue cools. With the key in the instrument and lightly closed on the tonehole, warm the glue to a liquid state and watch the spring try to push out the pad so that it automatically levels itself on the tonehole. The pad should not be forcefully bottomed out in the cup while the glue is molten or it will not come out level. Move the cup up and down slightly while the glue is still molten so you can see the pad move in and out of the cup a little to make sure that the pad is not bottomed in the cup. Then hold the cup perfectly steady during cool down. A wet rag applied to the cup will help speed cooling.
When setting up cups that are linked together with mechanisms – start at the bottom of the right hand and work upward, leaving out the upper pads till last. Repeat with the left hand starting from the bottom. When you hold down the lower touchpiece and heat the upper cup that is linked to it – the upper pad will automatically adjust itself because the coil spring will automatically take up any loose clearance.
This method works on JS pads because they are flat and have a stiff backing. It doesn’t work on octave pads and may or may not work on small diameter pads or pads that are way off center on the tonehole. The pad can be just a little light in the front opposite the key-hinge but should close completely with light finger pressure. If the pad does not cover perfectly then you must carefully apply heat only to the area that you want to correct (don’t overheat) (see Gold pad install video).
SIZING
Most popular pad sets are in stock. If I don’t have the sizes of an unusual brand then you must determine the pad size by measuring the smallest inside diameter of each cup. Note that the inserts are not flexible and will not force fit into a cup that is too small
CLEANING
To clean a gold pad, insert an alcohol swab over the tonehole, close the cup and drag out the swab (or use rubbing alcohol on cloth). For any pad that has a tendency to stick – order “JS Magic Dust” . This dry lubricant (MOS2) works great. It is non-toxic and being a lubricant – it can only help the keywork. JS Gold pads have a portion of magic dust embeded into the skin along with the gold. The dry lubricant releases slowly throughout the lifetime of the pad to prevent sticking.
DAMAGE
If a gold pad suffers a dent or fingernail mark etc. Heat up a piece of thick flat metal in an oven to 300 deg F (use an oven thermometer and do not exceed 320 deg F). Then hold it against the face of the pad for a few seconds.